This article describes how to enable and use Call Recording with your Elevate services.
The following topics will be covered in the article:
TABLE OF CONTENTS
- Enable Call Recording
- AI Call Recap for Users
- Enabling AI Call Recap for Users
- Using On-Demand Call Recording
- Using Automatic Call Recording
- Enable Call Recordings for Hunt Groups
- Enabling AI Call Recap for Hunt Groups
- Manage Call Recordings for Hunt Groups
- Finding/Downloading Call Recordings
- Call Recordings notifications
- Call Recordings storage information
- Call Recording Settings
- Call Recording Settings for Users and Groups
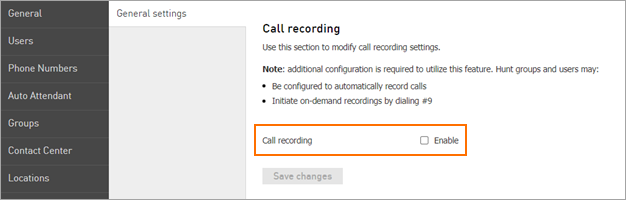
Enable Call Recording
This section explains how to enable call recording for users, hunt groups, and resource lines.
Note: only the Account owner can enable this feature otherwise, the following message will appear. If the Call Recording feature is greyed out when you are trying to enable it, this means that you lack Account Owner permissions. Once enabled, other administrators can adjust the call recording settings.

Steps to enable:
Log into CONTROL PANEL as the account owner.
Navigate to Services > Elevate at the top of the screen.
Select General from the left navigation pane.
Scroll to the Call Recording section in the General Settings.
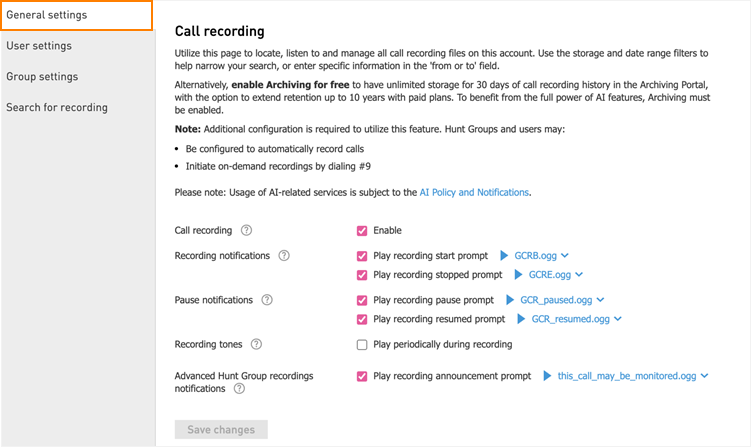
Enable call recording by checking the appropriate box.
Additional configuration options will appear, such as:
Recording notifications
Pause notifications
Recording tones
Accept the terms by ticking the corresponding checkbox.
Click Save changes to apply.
Important: If a call is forwarded to an off-net number (for example, a mobile phone or a number with another carrier/provider), the call leaves the Company network and will not be recorded. Call recording is only supported for calls that remain within the Company platform.
Note: Call Recording is supported for Users, Hunt Groups, and Resource lines.
Once the Account owner is logged in, the option to enable call recording will become available.
Clicking on the enable box will allow you to also choose if a notification message should be played before the recording starts.
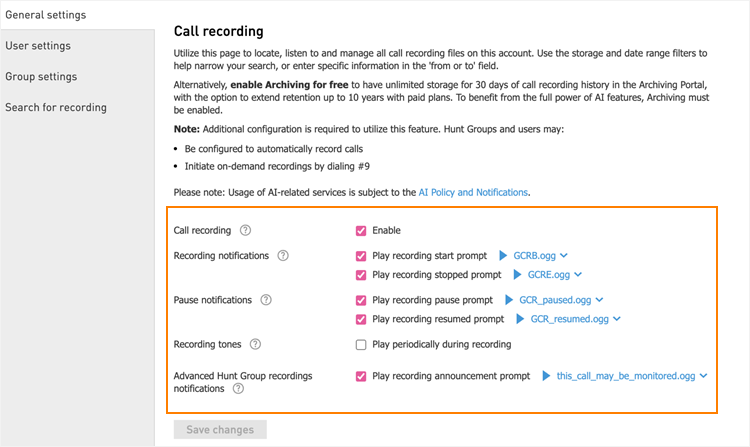
Accept terms for using Call Recordings.
Once changes are saved, the Call Recordings feature is ready for immediate use with On-Demand recording; if you require Automatic Call recording, you will need to enable it within your specified settings panel.
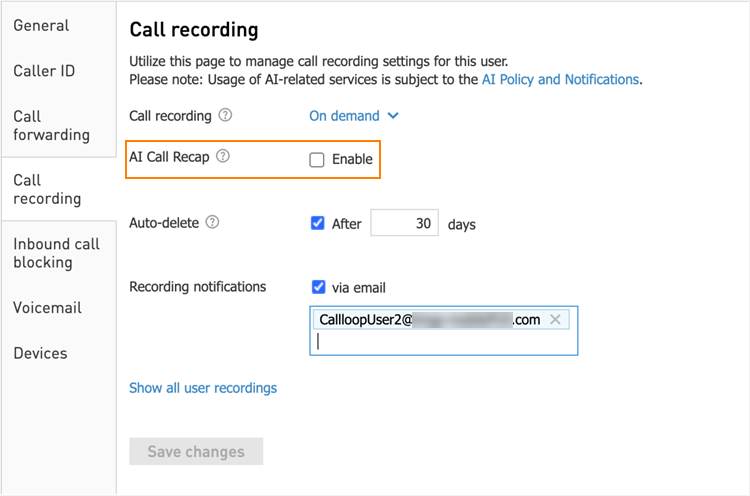
AI Call Recap for Users
Enable AI Call Recap for individual users to automatically generate transcriptions, AI summaries, and AI insights for their call recordings. For details on how users can access and use AI Call Recap, see: Elevate Desktop App and Teams Embedded App: Call Recordings and AI Call Recap).
Enabling AI Call Recap for Users
- Navigate to the Users section in CONTROL PANEL.
- Select the user for whom you want to enable AI Call Recap and click on the user’s name.
Note: the AI Call Recap option is available only for users with one of the following license types: Essentials/Teams Essentials, Pro/Teams Pro, or Enterprise/Teams Enterprise. - On the user’s Profile page, open the Call recording tab.
- Select the AI Call Recap checkbox.
- Click Save changes to apply the configuration.
Using On-Demand Call Recording
On-Demand Call Recording allows users to manually control call recordings during an active call. To start or pause an on-demand recording:
- During an active call, click the Call Recordingcontrol to start recording.
- You can also start recording using the dial pad by pressing #9.
- If enabled, the audio prompt The call is being recorded plays when recording starts.
- To pause the recording, click Call Recording again or press #0 on the dial pad.
- When the call ends or the recording is stopped, the recording is saved as an .mp3 file and sent via email to the user who initiated the recording.
Note: call recording notification requirements vary by state. Administrators can enable or disable the recording announcement to comply with local regulations.
For more information, see the article Elevate Desktop App and Teams Embedded App: Call Recordings and AI Call Recap, Managing Call Recordings section.
Using Automatic Call Recording
User Recording Settings
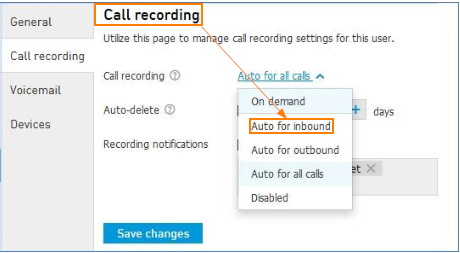
For individual users, it is possible to specify whether to record all inbound calls, outbound calls, or both. This is done by selecting the appropriate option from the dropdown menu in call recording settings:
- Auto for inbound – records all inbound calls. Outbound calls that are not set to auto-recording can still be recorded on-demand.
- Auto for outbound – records all outbound calls. Inbound calls that are not set to auto-recording can still be recorded on-demand.
- Auto for all calls – records both inbound and outbound calls.
Hunt Group Recording Settings
Hunt Groups use a fixed setting of Auto for all calls. All calls routed to the group are recorded automatically.
Note: users can pause or resume automatic call recordings during a call using #0 or via recording controls in the Elevate Desktop app or the Elevate Desktop Plugin for Teams. If account owners do not want agents to control Hunt Group call recordings, they should contact Support or their Sales representative to have this feature disabled.
Announcements and Compliance
If enabled, a voice prompt Your call is being recorded plays when recording starts. Administrators can enable or disable this prompt based on local compliance needs.
Note: state and regional laws may vary. Administrators should review local regulations to determine whether call‑recording announcements are required.
Accessing Recordings
When a call ends—or when recording is manually stopped—an .mp3 file of the recording is delivered to the user via email.
For Hunt Group calls, recordings are saved under the group’s Call Recordings settings for later review and management.
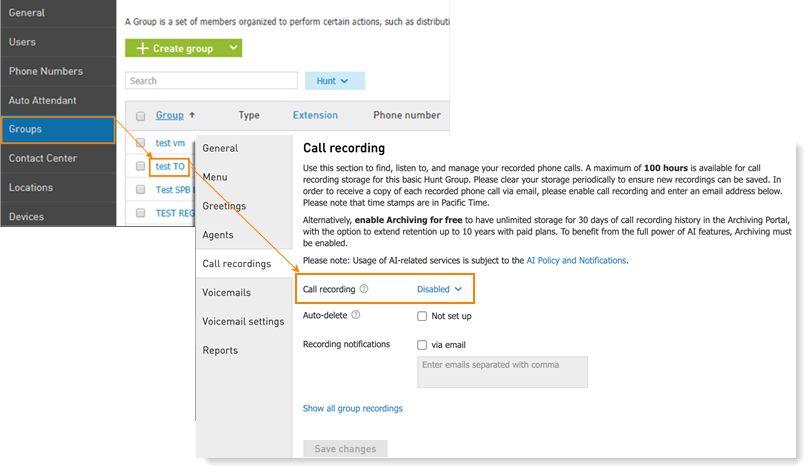
Enable Call Recordings for Hunt Groups
Call Recording for Hunt Groups allows recording of all calls received to the specific Hunt Group. Just enabling recording on CONTROL PANEL does not turn on Automatic Recording for your Hunt Groups and this will need to be enabled on each Hunt Group you wish to record.
To enable it:
Click the Groups tab, then click on the name of the Hunt Group you wish to enable call recording for.
Click Enable to the right from Call recordings are disabled, then click Save Changes at the bottom of the page to commit the setting.
Enabling AI Call Recap for Hunt Groups
- In the same Hunt Group settings page, open the Call recording tab.
- Select the checkbox AI Call Recap.
- Click Save changes to confirm.

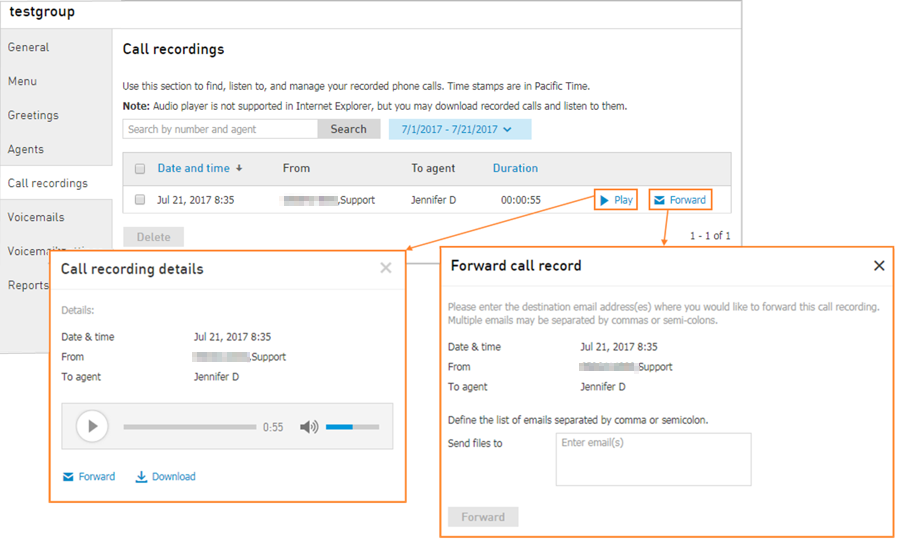
Manage Call Recordings for Hunt Groups
Once Call Recording is enabled on the hunt group, any inbound calls to the Hunt Group will automatically be recorded and stored in the Call Recordings section of the Hunt Group settings.
To view the call recordings:
- Click Hunt Groups then click on the name of the Hunt Group you want to view Call Recordings for
- In the main window on the right, you are presented with a list of all Call Recordings saved for this group. Here you can:
- Listen to a recording by clicking the Playbutton.
- On the next window, you will be able to play the recording, as well as have additional options to Forward the recording, or Download the recording as a .mp3 file.
- Forward a recording by clicking the Forwardbutton.
- On the next window you can enter one or more email addresses to send the recording to; click the Forward button at the bottom to send the email.
- Listen to a recording by clicking the Playbutton.
Finding/Downloading Call Recordings
To find and download call recordings one by one or in bulk, navigate to the Call Recordings section and run a search for the desired user or Hunt Group.
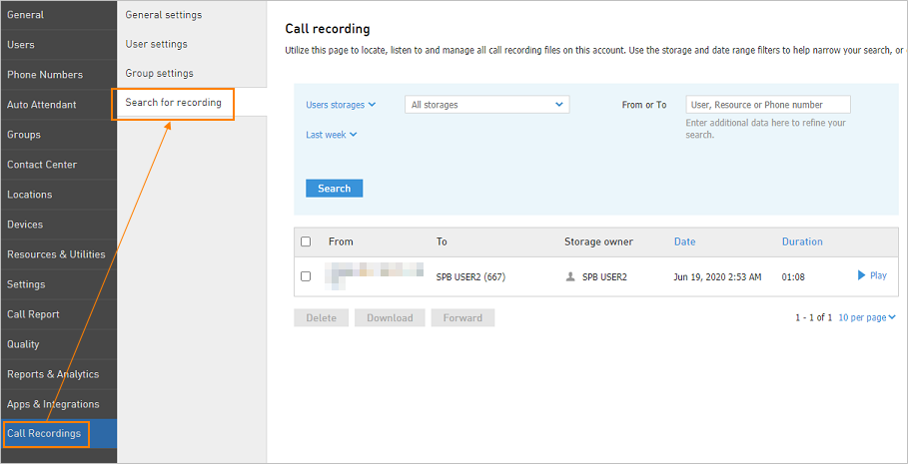
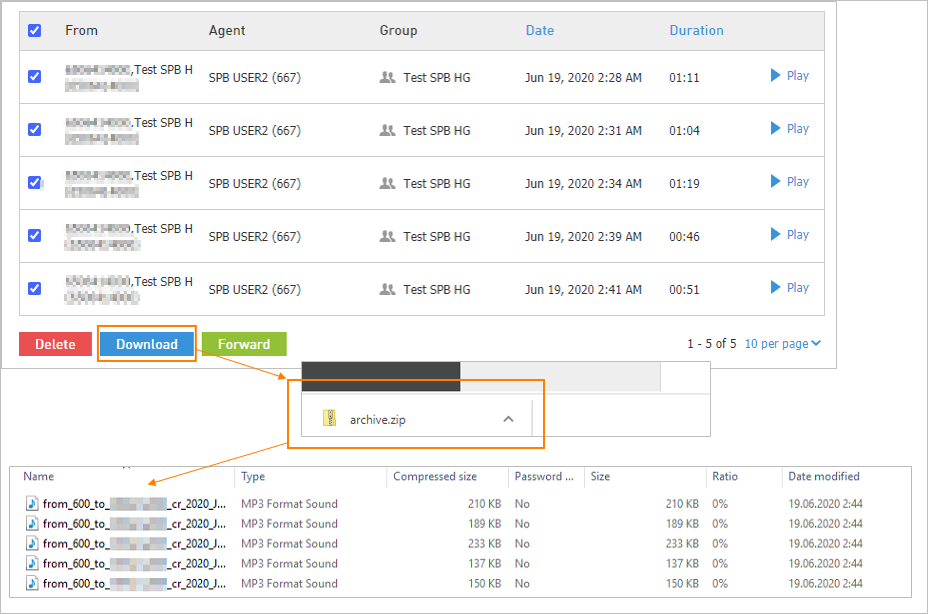
Once the needed call recordings have been found, they can be downloaded by placing a checkmark in the box next to the desired call recordings and then clicking on the Download button.
An archived zip file, with the filename archive.zip, will be downloaded to your browser's downloads folder. The archived folder contains .mp3 files of all the recordings. The audio file name is formatted to include the phone number, date and time of the call recording.
When a call ends or a recording is stopped, an .mp3 file of the recording will be delivered via email to the end user who initiated the recording.
Call Recordings notifications
- For On-Demand Call Recording:
When the call is ended or recording stopped, an .mp3 file of recording is delivered to the end user who initiated the recording via email.
Note: The email address that is set for user voicemail will be used for call recording files. If a recorded call was too long (~more than 2 hrs) it may not be delivered by your email provider due to attachment size limitation which is usually around 25 MB.
- For Automatic Call recording in Hunt Groups:
You can enable Email Notifications for calls received to the Hunt Group:
- Click on the Call recordings tab from the Hunt Group settings.
- Next to the Call Recordings option, click Notifications not set up.
- Check the Email box, then enter your preferred email in the text box below.
- Click Save changes at the bottom of the window to commit the settings.

Call Recordings storage information
- Each User or Resource, when receiving and recording direct phone calls, has up to 90 days or 48 hours of storage time
- Each Hunt Group may store up to 100 hours of Agent call recordings.
- Each Advanced Hunt Group may store up to 200 hours of Agent call recordings.
- A warning email will be sent to the user when storage reaches 80%, 90% and 100% of capacity. If the autodelete option wasn't activated for a user or a Hunt Group, once capacity has been reached, older call recordings will not be overwritten, so the storage will need to be cleared out. Additionally, when capacity has been reached, and a new call is recorded, it will not be stored on the account, however, if the customer has the option enabled to send an email notification with the recorded files, they will still receive that email containing the call recording.
Note: if Call recordings are enabled for both the Basic/Advanсed Hunt Group and for the agent (i.e. the user) who is a member of this group, the calls will be recorded for both of them: for the group and for the user.
Call Recording Settings
Call Recording Types:
- On-Demand
- Automatic inbound only
- Automatic outbound only
- Automatic for all calls
- Disabled
- To access the new Call Recording settings, open the User in CONTROL PANEL and go to Elevate > Call Recording.
- The Call Recording field allows the user to choose which calls will be recorded. Options include On demand, Auto for inbound, Auto for outbound, Auto for all calls or Disabled.
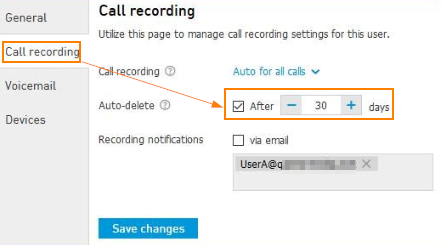
- The Auto-Delete field lets the Admin choose how long the recordings will be saved on Company Server.
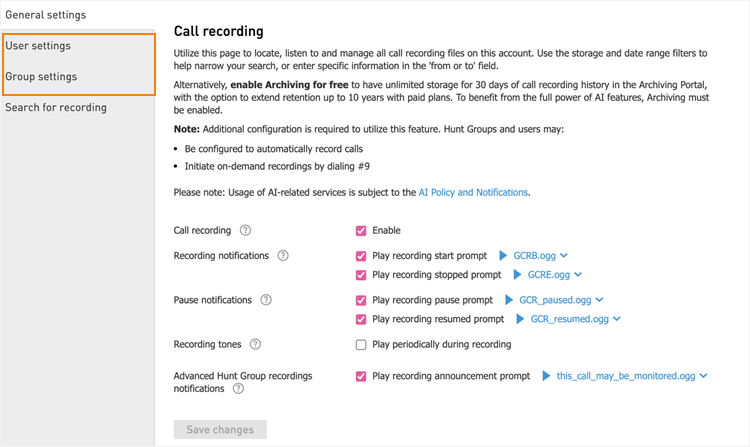
Call Recording Settings for Users and Groups
There are three options under the Call Recordings Section.
General Settings
- Enable or disable call recording for the account.
- Enable or disable recorded prompts for starting and stopping or pausing and resuming a call recording along with the ability to choose the default recording or upload a custom recording.
- Enable or disable a beep tone periodically during a call recording.
User Settings
- Configure the call recording type for each individual User or Resource on the account.

- Enable or disable call recording email notifications for each individual User or Resource on the account.
- Set the auto delete time for the number of days for call recordings should be saved on Elevate servers.
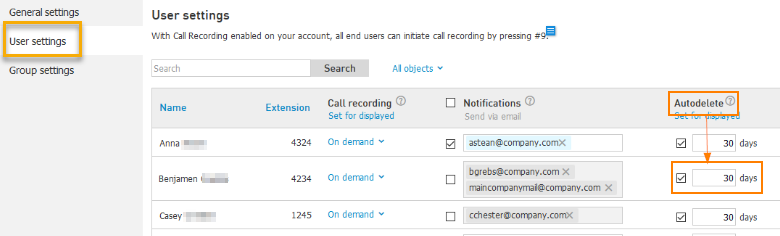
Note: Call recordings for a Resource line can be set from the User settings navigation.
Group Settings
- Configure the call recording type for each individual Group on the account.
- Enable or disable call recording email notifications for each individual Group on the account.
- Set the auto delete time for the number of days for call recordings to be saved on the servers.

Was this article helpful?
That’s Great!
Thank you for your feedback
Sorry! We couldn't be helpful
Thank you for your feedback
Feedback sent
We appreciate your effort and will try to fix the article